Home
 /
 / 

Gillingham to Hammersmith by boat

Gillingham to Hammersmith

Distance - 62.3 Nm

Avg Speed
5 kts
10 kts
20 kts
30 kts
Time Estimate
12 hr 26 min
6 hr 13 min
3 hr 6 min
2 hr 4 min
Gillingham to Hammersmith

Gillingham to Hammersmith

### Pilotage Plan: Gillingham to Hammersmith, GB#### Overview
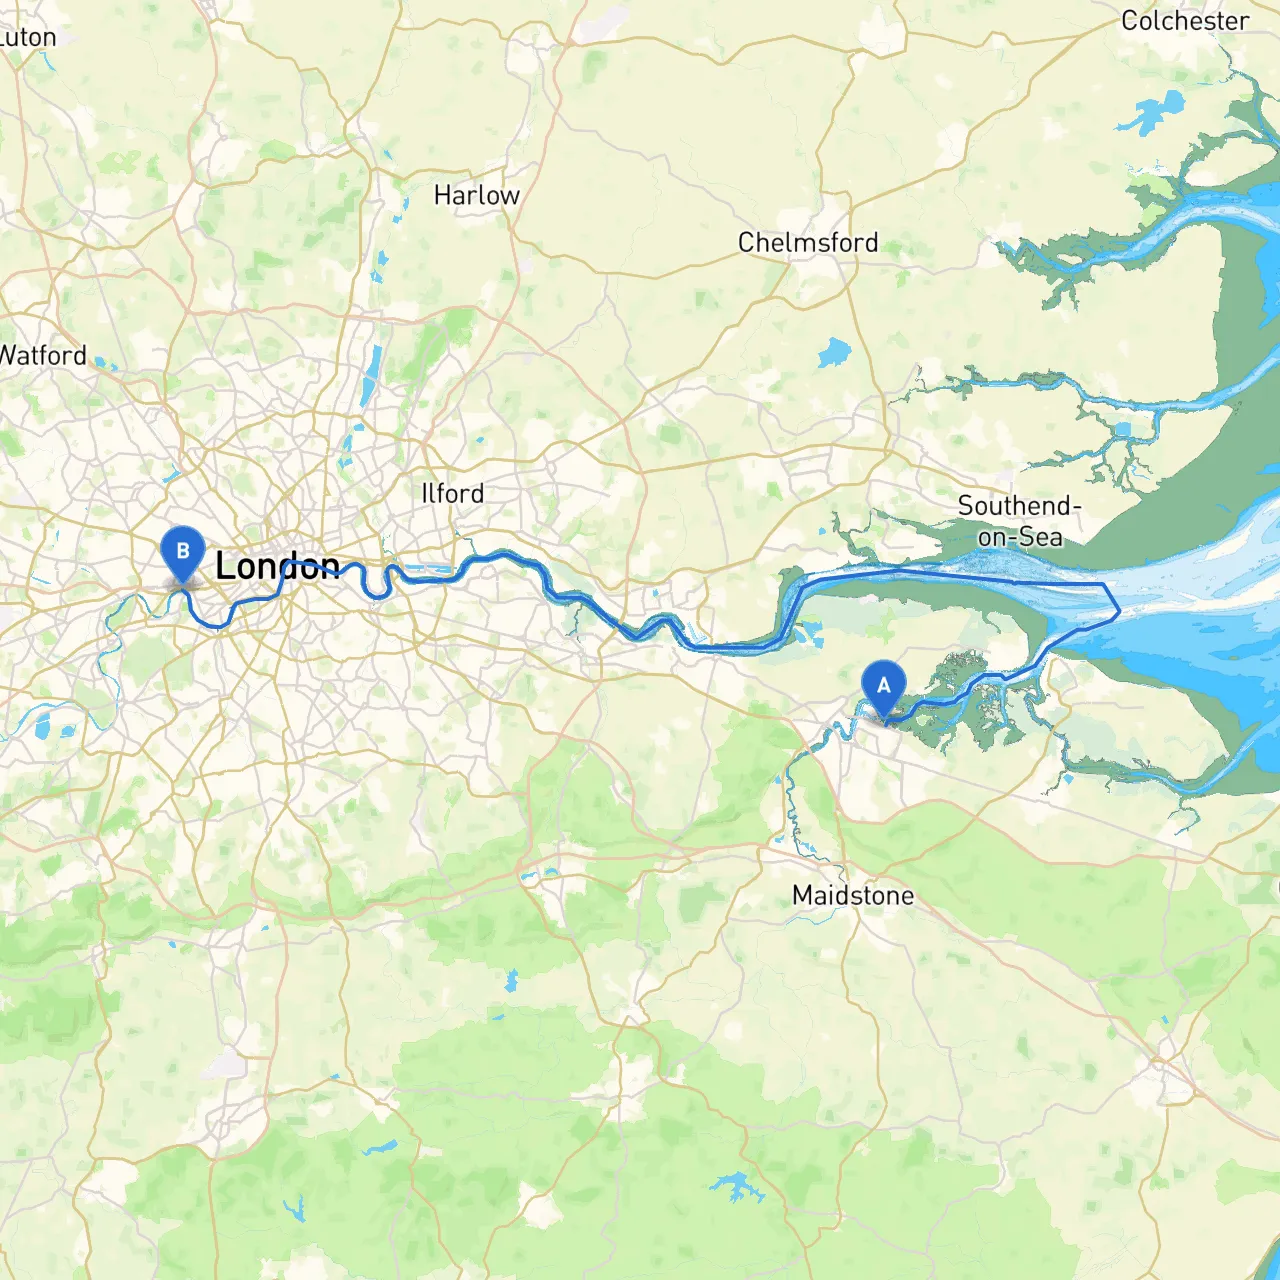
Embarking on a journey from Gillingham to Hammersmith offers a unique perspective of the picturesque landscapes and bustling waterways of southern England. This route, spanning approximately 50 nautical miles, promises both tranquil cruising and interesting landmarks, making it ideal for intermediate to seasoned boaters. Safety is paramount, and with proper preparation and awareness of navigational aids, this trip can be both enjoyable and secure.#### Leg 1: Gillingham to Chatham**Distance:** 5 nautical miles **Estimated Time:** 1-1.5 hours at cruising speed **Overview:** As you set out from Gillingham, you’ll navigate up the River Medway towards Chatham. This stretch is primarily calm but watch for commercial traffic as this is an active shipping channel. **Points of Interest:**- **Historic Dockyard Chatham:** A significant site for naval history, and if you plan, you might find time to explore the area upon your arrival.**Hazards:**- Watch for dredging operations and local fishing activities, both of which can change water depths unexpectedly.#### Leg 2: Chatham to Upnor Castle**Distance:** 3 nautical miles **Estimated Time:** 0.5 hours **Overview:** Continue upstream with the eastern shore revealing the scenic Upnor Castle. This leg is particularly pleasant if the weather cooperates, offering views of the riverbanks.**Shelter Options:** - **Upnor Pier:** A great stop to pick up some local knowledge and take in the historical architecture. This area also offers protection should conditions worsen.**Hazards:**- Be mindful of shallower waters as you approach the castle, especially near low tide.#### Leg 3: Upnor Castle to Strood**Distance:** 4 nautical miles **Estimated Time:** 0.5-1 hour **Overview:** The route to Strood is straightforward. The river widens, offering a bit of room to maneuver.**Navigational Aids:**- Pay attention to the buoys marking the channel. Follow the deep water and avoid any shallows on both sides of the river.#### Leg 4: Strood to Rochester**Distance:** 2 nautical miles **Estimated Time:** 0.5 hours **Overview:** This short leg offers another historic site, with Rochester Castle visible from the river. This area is rich in cultural heritage.**Points of Interest:**- **Rochester Castle:** Another excellent opportunity for a quick scenic stop and exploration.**Hazards:**- Increased local traffic, including pleasure crafts and small yachts, can make this stretch busier.#### Leg 5: Rochester to the Thames Estuary**Distance:** 10 nautical miles **Estimated Time:** 2 hours **Overview:** As you progress toward the Thames Estuary, it’s important to prepare for potential tidal currents. This part of the river can be particularly affected by the tide.**Navigational Aids:**- **Green and Red Buoys:** Adhere to the well-marked buoys to avoid any danger.- Monitor your chart for any changing conditions, particularly as you approach the estuary.#### Leg 6: Thames Estuary to Gravesend **Distance:** 5 nautical miles **Estimated Time:** 1 hour **Overview:** The bustling activity here can be stimulating with cargo vessels and ferries in motion. Exercise caution, especially when crossing larger ship paths.**Shelter Options:**- **Gravesend** is an excellent place for a lunchtime stop where you can take a break and enjoy the local eateries.**Hazards:**- Considerable shipping traffic; be vigilant and maintain radio communication with harbor authorities. #### Leg 7: Gravesend to Woolwich**Distance:** 8 nautical miles **Estimated Time:** 1.5 hours **Overview:** This leg will lead you through the heart of the Thames, where navigating requires attentiveness to the maritime traffic and potentially changing tidal conditions.**Navigational Aids:**- Be prepared to consult your charts and digital navigation tools. The Woolwich Ferry will be part of your surroundings here; stay aware and yield to its operations.#### Leg 8: Woolwich to London Bridge**Distance:** 10 nautical miles **Estimated Time:** 2 hours **Overview:** Passing landmarks such as the O2 Arena and Greenwich, this section is highly scenic. Make sure your camera is handy for the fantastic views down the Thames.**Shelter Options:**- **Greenwich Marina:** A perfect place to shelter should weather conditions change and to break for exploration.#### Leg 9: London Bridge to Hammersmith**Distance:** 10 nautical miles **Estimated Time:** 2 hours **Overview:** The final stretch brings you to Hammersmith, where the Thames twists gracefully. Familiarize yourself with the local restrictions and navigational policies as you prepare to enter this busy area.**Navigational Aids:**- Watch for the various bridges and keep an eye on port direction signage. Be especially mindful of current and waterway traffic as you approach Hammersmith.#### ConclusionBy taking this route from Gillingham to Hammersmith, boaters can appreciate scenic landmarks whilst ensuring safety with each passing leg. Be sure to download **Savvy Navvy** along with other navigational apps to assist in real-time decision-making. Always have a life jacket on hand and check the weather before setting off, ready to enjoy all this thrilling route has to offer. Safe travels!

More routes from Gillingham to Hammersmith

No items found.